2185 products
2185 products
Sort by:
Newest Products


Bears large, quartered rosettes, each about 4” across, packed with loosely arranged petals. They are a beautiful shade of pure apricot, paling towards the edges. There is a lovely Tea fragrance, with hints of cedar wood and vanilla. Named for Plant Heritage, who do so much to protect Britain’s garden plant diversity.


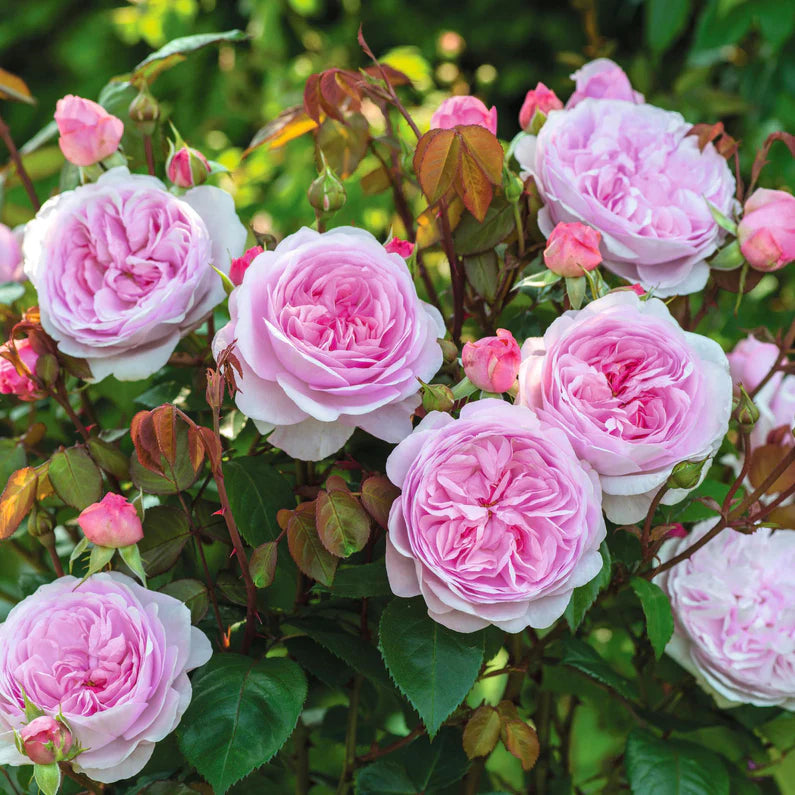
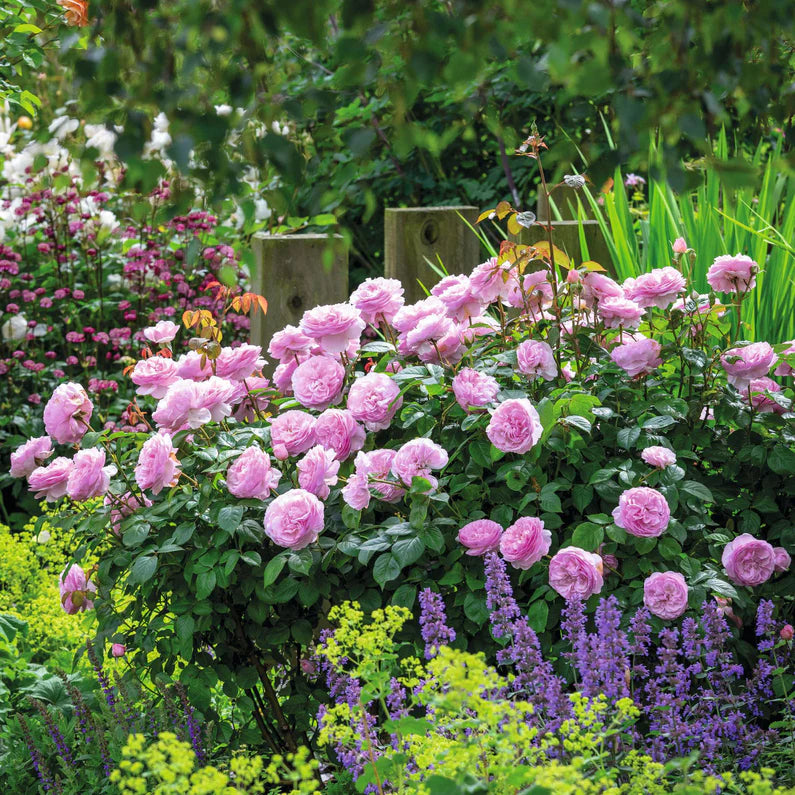
A magnificent variety, bearing medium sized, many petalled rosette blooms. They are a striking shade of deep pink, the outer petals of each bloom paling slightly over time. The beauty of the blooms is enhanced by a wonderful, strong fruity fragrance. A vigorous rose; it forms a very shapely, broad, rounded shrub with mulberry purple stems and dark green foliage, giving the overall impression of richness and abundance. Named after the beloved character in Thomas Hardy’s novel, Far from the Madding Crowd.
David Austin Roses were not developed for Zone 3. BUT it is possible to have success here in Manitoba by following a few key tips.
Choose a location that is not in line with strong north winds
Plant the crown (this is where the roots end and the woody shrub begins) of your rose 6”-12” below the surface of the soil. As your shrub will be in full leaf at time of purchase you can clean off leaves that will get buried if you like.
In the fall you will need to cover with a deep layer of mulch. Wood mulch, straw, leaves or a combination of all. Use a burlap tarp (Not Plastic) to cover and hold down with rocks or stakes. This will ensure the mulch is not blown away. A full wheelbarrow or more per rose is not out of the question. Throughout the winter direct your snow clearing efforts to cover your roses as well. The more insulation the better.
Don’t remove the tarp and mulch until night temperatures are consistently hovering about zero to +3 with no threat of deep freeze, as we sometimes see in April.
We hope you enjoy growing your David Austin Rose.
David Austin Roses were not developed for Zone 3. BUT it is possible to have success here in Manitoba by following a few key tips.
_________________________________________________________________________
You have three options, you can enjoy your David Austin Rose for a single season. You can plan to bring your potted David Austin Rose into a warmer winter environment, or you can plant it into the ground.
If you decide to enjoy your rose for the summer:
Feel free to drop your potted David Austin Rose into a decor pot of your liking, but do not pot it up into a larger size planter. You do not want to set back your rose. We use our Rose and Perennial Mix when potting up all our David Austin Roses and other than fertilizing your rose every other week they are simple to care for. In our experience you should have blooms from late June right through till fall.
If you decide to grow and over winter your rose in a pot:
First, you must be sure you have a place to overwinter your David Austin Rose and you should pot up your rose into a planter large enough for min of 2 years growth, using our rose and perennial mix.
Do not use pro mix.
A heated garage or sunroom that can be set between -2C and -5C. You will also need to keep your rose away from doors that open to -35C or colder. Your Rose needs to go dormant for a few months. Once the temp is over zero C you will see your rose begin to send out new shoots. At this point natural light is necessary and the temperature should not go below -1C at night. It is important to keep your shrub moist but not wet. Check temperature regularly. Do not bring it into the house! Roses can handle cool nights and warmer days.
If you decide to plant your rose in the ground:
Choose a location that is not in line with strong north winds
Plant the crown (this is where the roots end and the woody shrub begins) of your rose 6”-12” below the surface of the soil. As your shrub will be in full leaf at time of purchase you can clean off leaves that will get buried if you like.
In the fall you will need to cover with a deep layer of mulch. Wood mulch, straw, leaves or a combination of all. Use a burlap tarp (Not Plastic) to cover and hold down with rocks or stakes. This will ensure the mulch is not blown away. A full wheelbarrow or more per rose is not out of the question. Throughout the winter direct your snow clearing efforts to cover your roses as well. The more insulation the better.
Don’t remove the tarp and mulch until night temperatures are consistently hovering about zero to +3 with no threat of deep freeze, as we sometimes see in April.
We hope you enjoy growing your David Austin Rose.
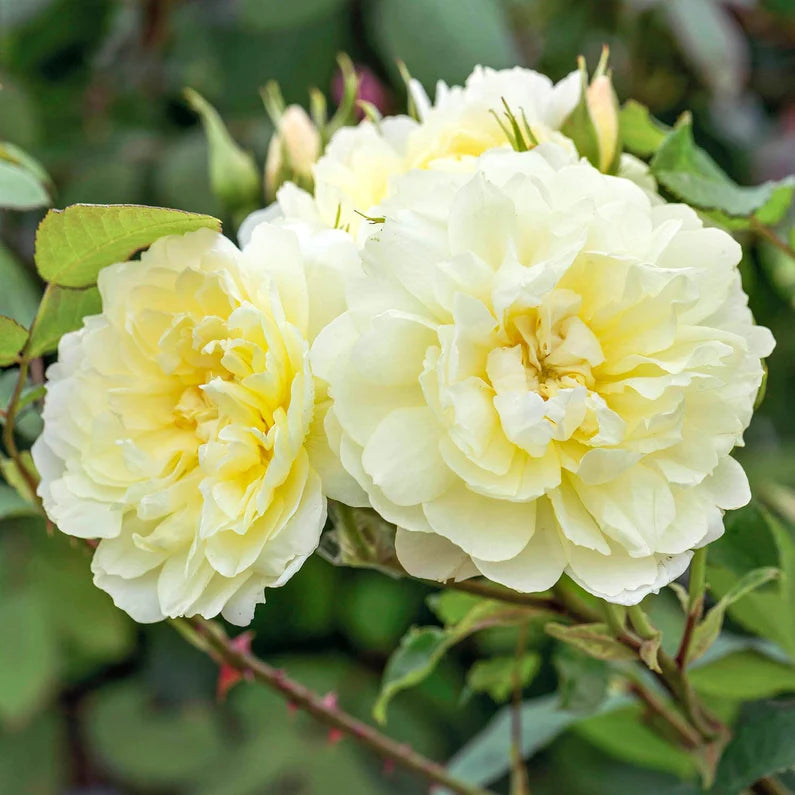
Bears pretty, lightly scented, pale yellow blooms, fading almost to cream. The many delicately frilled petals are arranged around a button eye. It forms a sturdy, quite upright shrub with glossy foliage. Named after the character in Shakespeare's Cymbeline. David Austin, 2016.
David Austin Roses were not developed for Zone 3. BUT it is possible to have success here in Manitoba by following a few key tips.
Choose a location that is not in line with strong north winds
Plant the crown (this is where the roots end and the woody shrub begins) of your rose 6”-12” below the surface of the soil. As your shrub will be in full leaf at time of purchase clean off leaves that will get buried.
In the fall you will need to cover with a deep layer of mulch. Wood mulch, straw, leaves or a combination of all. Use a burlap tarp (Not Plastic) to cover and hold down with rocks or stakes. This will ensure the mulch is not blown away. A full wheelbarrow or more per rose is not out of the question. Throughout the winter direct your snow clearing efforts to cover your roses as well. The more insulation the better.
Don’t remove the tarp and mulch until night temperatures are consistently hovering about zero to +3 with no threat of deep freeze, as we sometimes see in April.
We hope you enjoy growing your David Austin Rose.


Soft orange-red buds open to medium-sized, cupped rosettes of perfect apricot coloring. They are extremely robust and have a lovely fruity Tea scent. Very healthy; it matures into an attractive, rounded, bushy shrub with few thorns. Named to mark the centenary of Roald Dahl’s birth, with the approval of his wife, Liccy Dahl – the colouring reminiscent of the eponymous peach in James and the Giant Peach.
David Austin Roses were not developed for Zone 3. BUT it is possible to have success here in Manitoba by following a few key tips.
_________________________________________________________________________
You have three options, you can enjoy your David Austin Rose for a single season. You can plan to bring your potted David Austin Rose into a warmer winter environment, or you can plant it into the ground.
If you decide to enjoy your rose for the summer:
Feel free to drop your potted David Austin Rose into a decor pot of your liking, but do not pot it up into a larger size planter. You do not want to set back your rose. We use our Rose and Perennial Mix when potting up all our David Austin Roses and other than fertilizing your rose every other week they are simple to care for. In our experience you should have blooms from late June right through till fall.
If you decide to grow and over winter your rose in a pot:
First, you must be sure you have a place to overwinter your David Austin Rose and you should pot up your rose into a planter large enough for min of 2 years growth, using our rose and perennial mix.
Do not use pro mix.
A heated garage or sunroom that can be set between -2C and -5C. You will also need to keep your rose away from doors that open to -35C or colder. Your Rose needs to go dormant for a few months. Once the temp is over zero C you will see your rose begin to send out new shoots. At this point natural light is necessary and the temperature should not go below -1C at night. It is important to keep your shrub moist but not wet. Check temperature regularly. Do not bring it into the house! Roses can handle cool nights and warmer days.
If you decide to plant your rose in the ground:
Choose a location that is not in line with strong north winds
Plant the crown (this is where the roots end and the woody shrub begins) of your rose 6”-12” below the surface of the soil. As your shrub will be in full leaf at time of purchase you can clean off leaves that will get buried if you like.
In the fall you will need to cover with a deep layer of mulch. Wood mulch, straw, leaves or a combination of all. Use a burlap tarp (Not Plastic) to cover and hold down with rocks or stakes. This will ensure the mulch is not blown away. A full wheelbarrow or more per rose is not out of the question. Throughout the winter direct your snow clearing efforts to cover your roses as well. The more insulation the better.
Don’t remove the tarp and mulch until night temperatures are consistently hovering about zero to +3 with no threat of deep freeze, as we sometimes see in April.
We hope you enjoy growing your David Austin Rose.


An exceedingly pretty rose of soft, glowing apricot-pink, each bloom packed with numerous delicately ruffled petals. Held on red-tinged stems, the blooms begin as shallow cups, opening to full rosettes, revealing petals of a richer hue, which gradually pale over time. They have a delicious strong fruity fragrance. A very healthy variety; itmakes a strong, vigorous shrub with bushy, upright growth. Named after the flawed heroine of Thomas Hardy’s, The Return of the Native.


With its vigorous, upright growth it makes a wonderful climber in a short time. The strikingly beautiful flowers are mid pink at the centre, gradually becoming lighter towards the edges. The numerous, neatly placed petals in each bloom create a slightly domed shape. Named after the Irish flautist.
David Austin Roses were not developed for Zone 3. BUT it is possible to have success here in Manitoba by following a few key tips.
Choose a location that is not in line with strong north winds
Plant the crown (this is where the roots end and the woody shrub begins) of your rose 6”-12” below the surface of the soil. As your shrub will be in full leaf at time of purchase you can clean off leaves that will get buried if you like.
In the fall you will need to cover with a deep layer of mulch. Wood mulch, straw, leaves or a combination of all. Use a burlap tarp (Not Plastic) to cover and hold down with rocks or stakes. This will ensure the mulch is not blown away. A full wheelbarrow or more per rose is not out of the question. Throughout the winter direct your snow clearing efforts to cover your roses as well. The more insulation the better.
Don’t remove the tarp and mulch until night temperatures are consistently hovering about zero to +3 with no threat of deep freeze, as we sometimes see in April.
We hope you enjoy growing your David Austin Rose.


The flowers start as small buds, opening to full petalled, wide open rosettes of a bright crimson-red. As the flowers age, the blooms becomes dome-shaped while the colour – unusually for the English Roses – gradually intensifies. It forms a very bushy, neatly rounded shrub with slightly arching growth. Named after the well-known writer, journalist and broadcaster.
David Austin Roses were not developed for Zone 3. BUT it is possible to have success here in Manitoba by following a few key tips.
Choose a location that is not in line with strong north winds
Plant the crown (this is where the roots end and the woody shrub begins) of your rose 6”-12” below the surface of the soil. As your shrub will be in full leaf at time of purchase clean off leaves that will get buried.
In the fall you will need to cover with a deep layer of mulch. Wood mulch, straw, leaves or a combination of all. Use a burlap tarp (Not Plastic) to cover and hold down with rocks or stakes. This will ensure the mulch is not blown away. A full wheelbarrow or more per rose is not out of the question. Throughout the winter direct your snow clearing efforts to cover your roses as well. The more insulation the better.
Don’t remove the tarp and mulch until night temperatures are consistently hovering about zero to +3 with no threat of deep freeze, as we sometimes see in April.
We hope you enjoy growing your David Austin Rose.

Dimensions: 10" x 20"

Start your seedlings off right with their own Mini Greenhouse
This easy to use kit includes everything you need to start flower or vegetable seedlings, propagate fresh cuttings, or grow fresh herbs right in your kitchen all year long. The SunBlaster™ NanoDome is made exclusively for SunBlaster T5HO Combo's and LED Strip Lights, with a unique H pattern which enables you to lay your lighting across a single dome or multiple domes. Kit includes heavy duty 1020 tray, 7" vented NanoDome, and SunBlaster 18" T5HO 6400K Combo lighting kit.
- Mini Greenhouse Kit
- NanoTech T5 Reflector
- Nano Dome and Double Thick 1020 tray.
- Includes: SunBlaster 18" T5HO
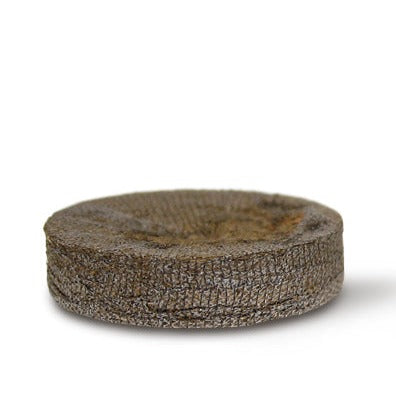
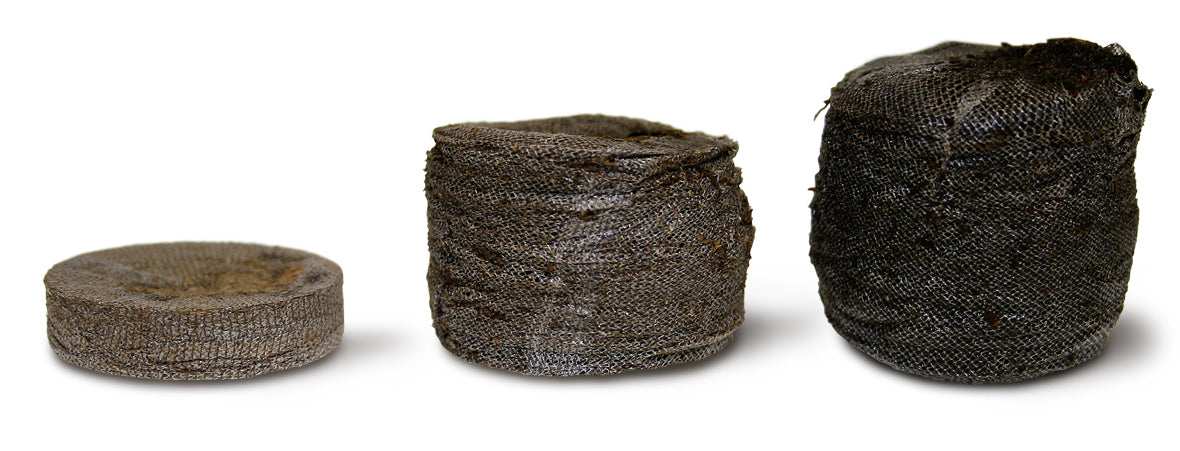
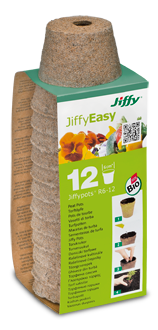
The Jiffy pellet: fine netting is filled with high-quality substrate and then compressed to form a handy pellet. Just add water, and the little planting wonder grows to up to seven times its size in a few moments.
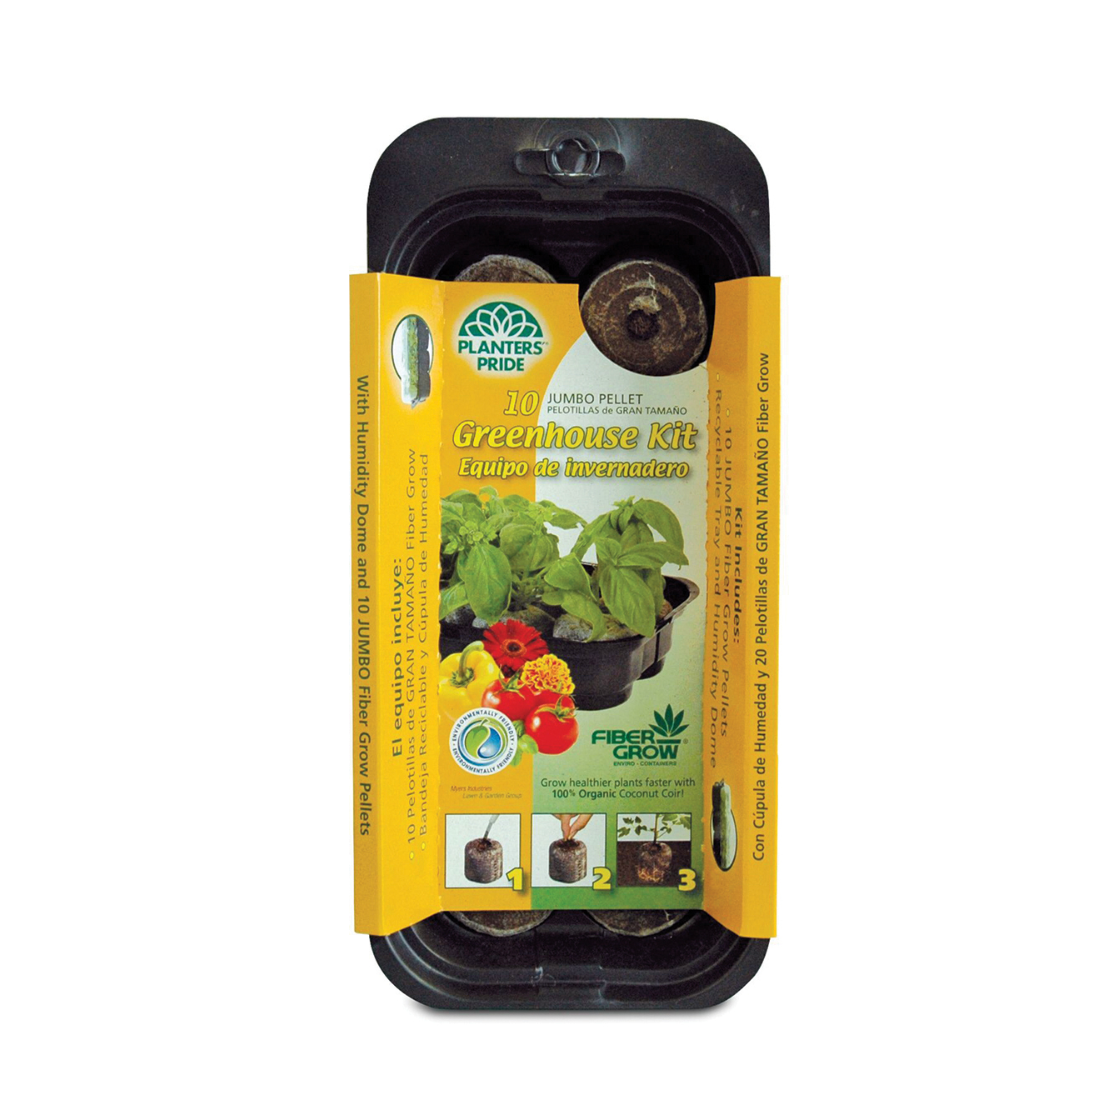
Coconut Coir starter kit contains 10 Jumbo pellets, tray and humidity dome.
Tray and dome can be reused.
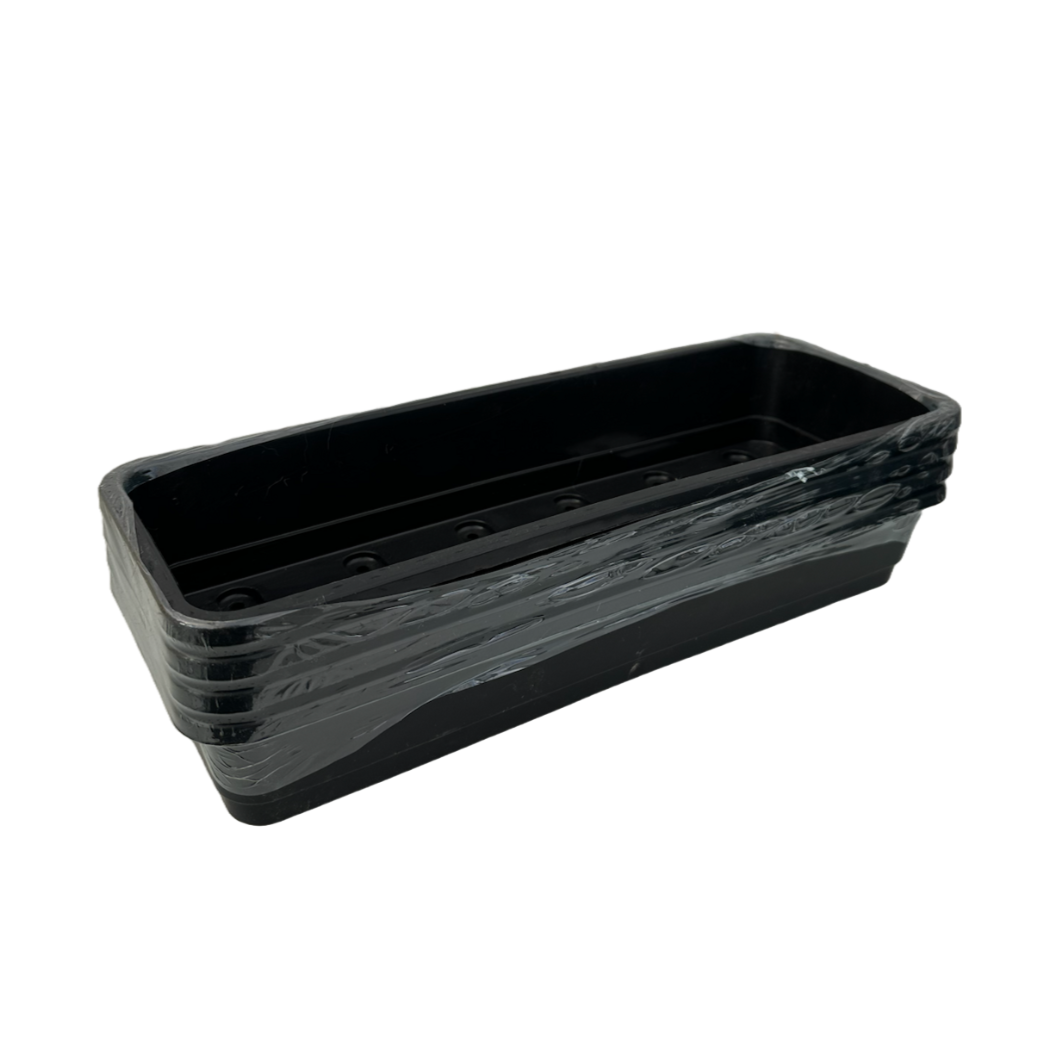
This seeding tray is perfect for the window ledge. Seed directly into this tray or use as a holding tray for assorted starters. Re-useable year after year, simply wash with hot soapy water before packing away.
Comes in a 4 pack.
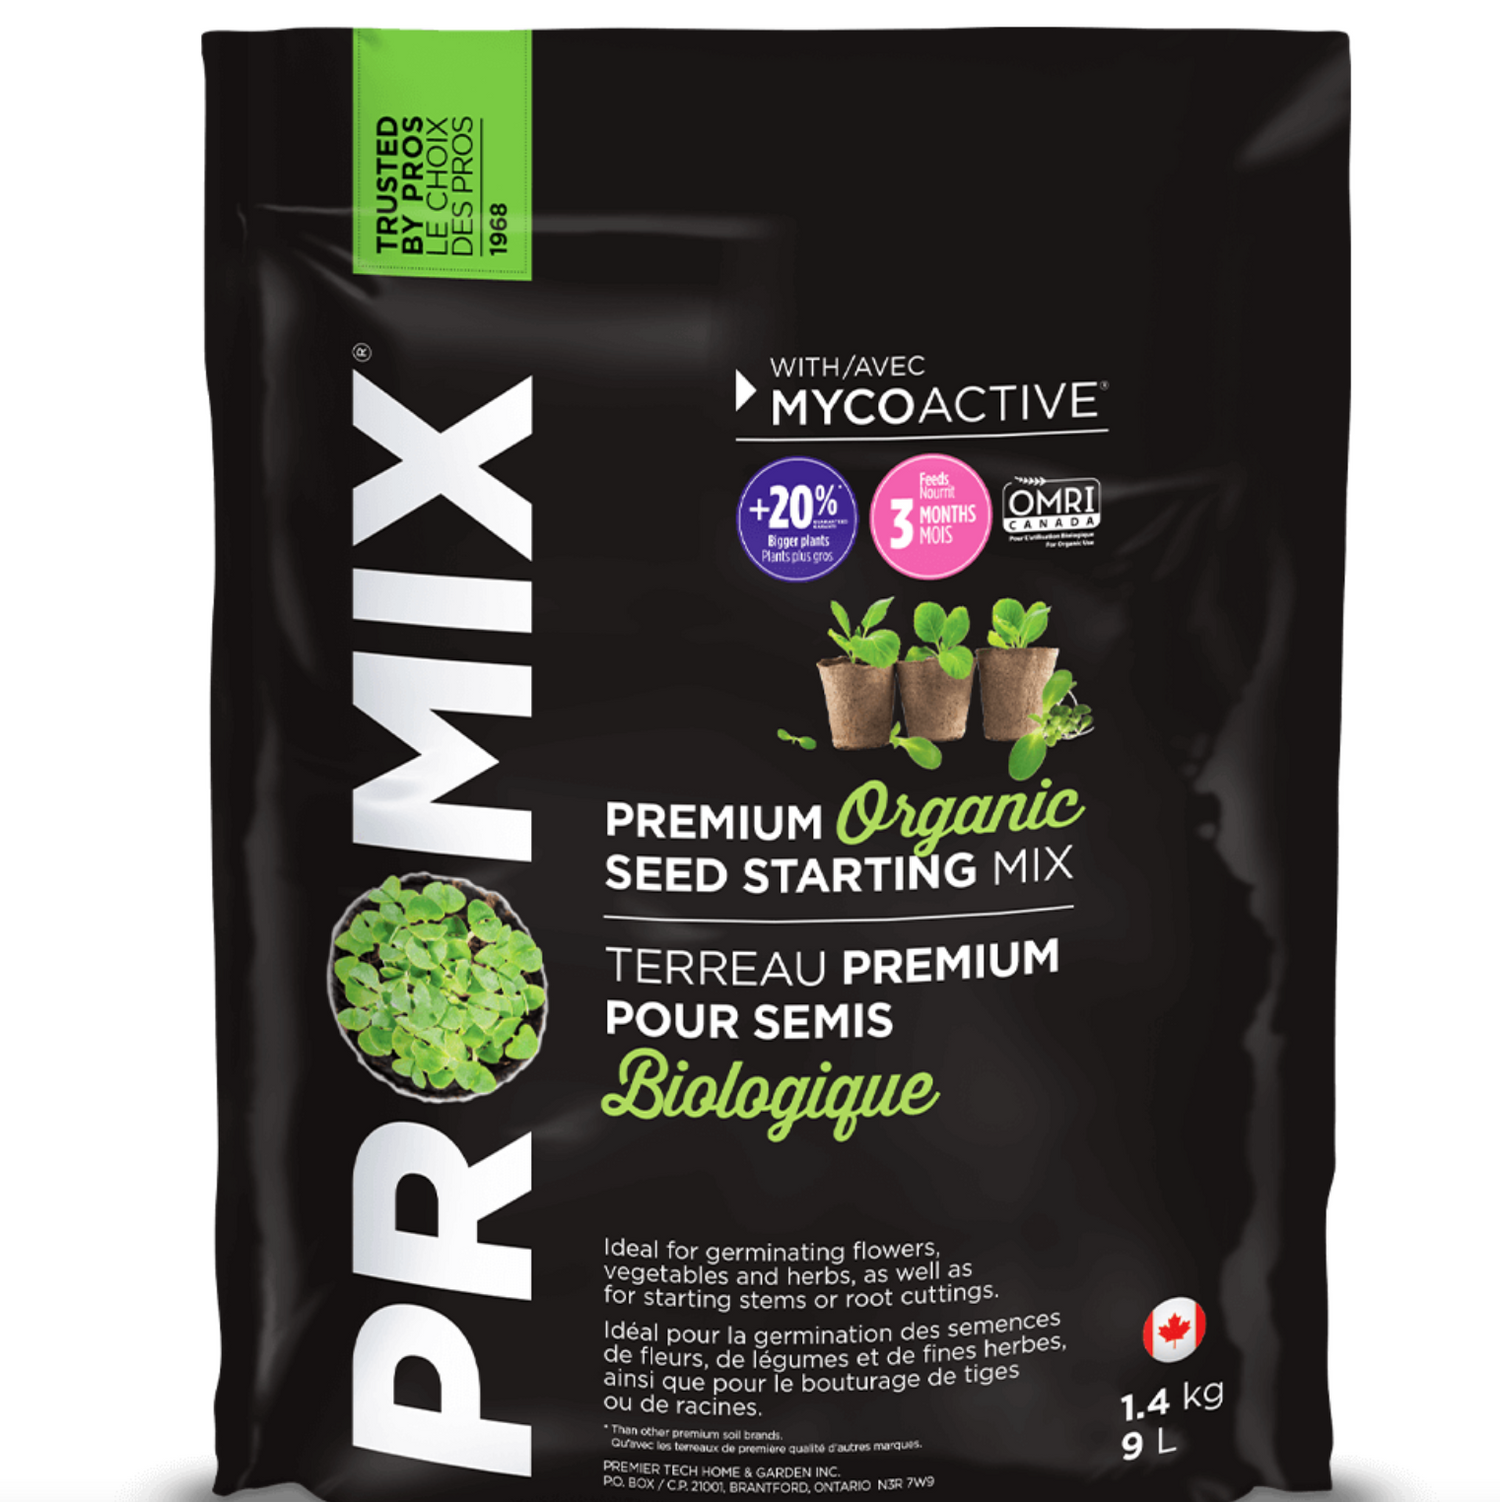
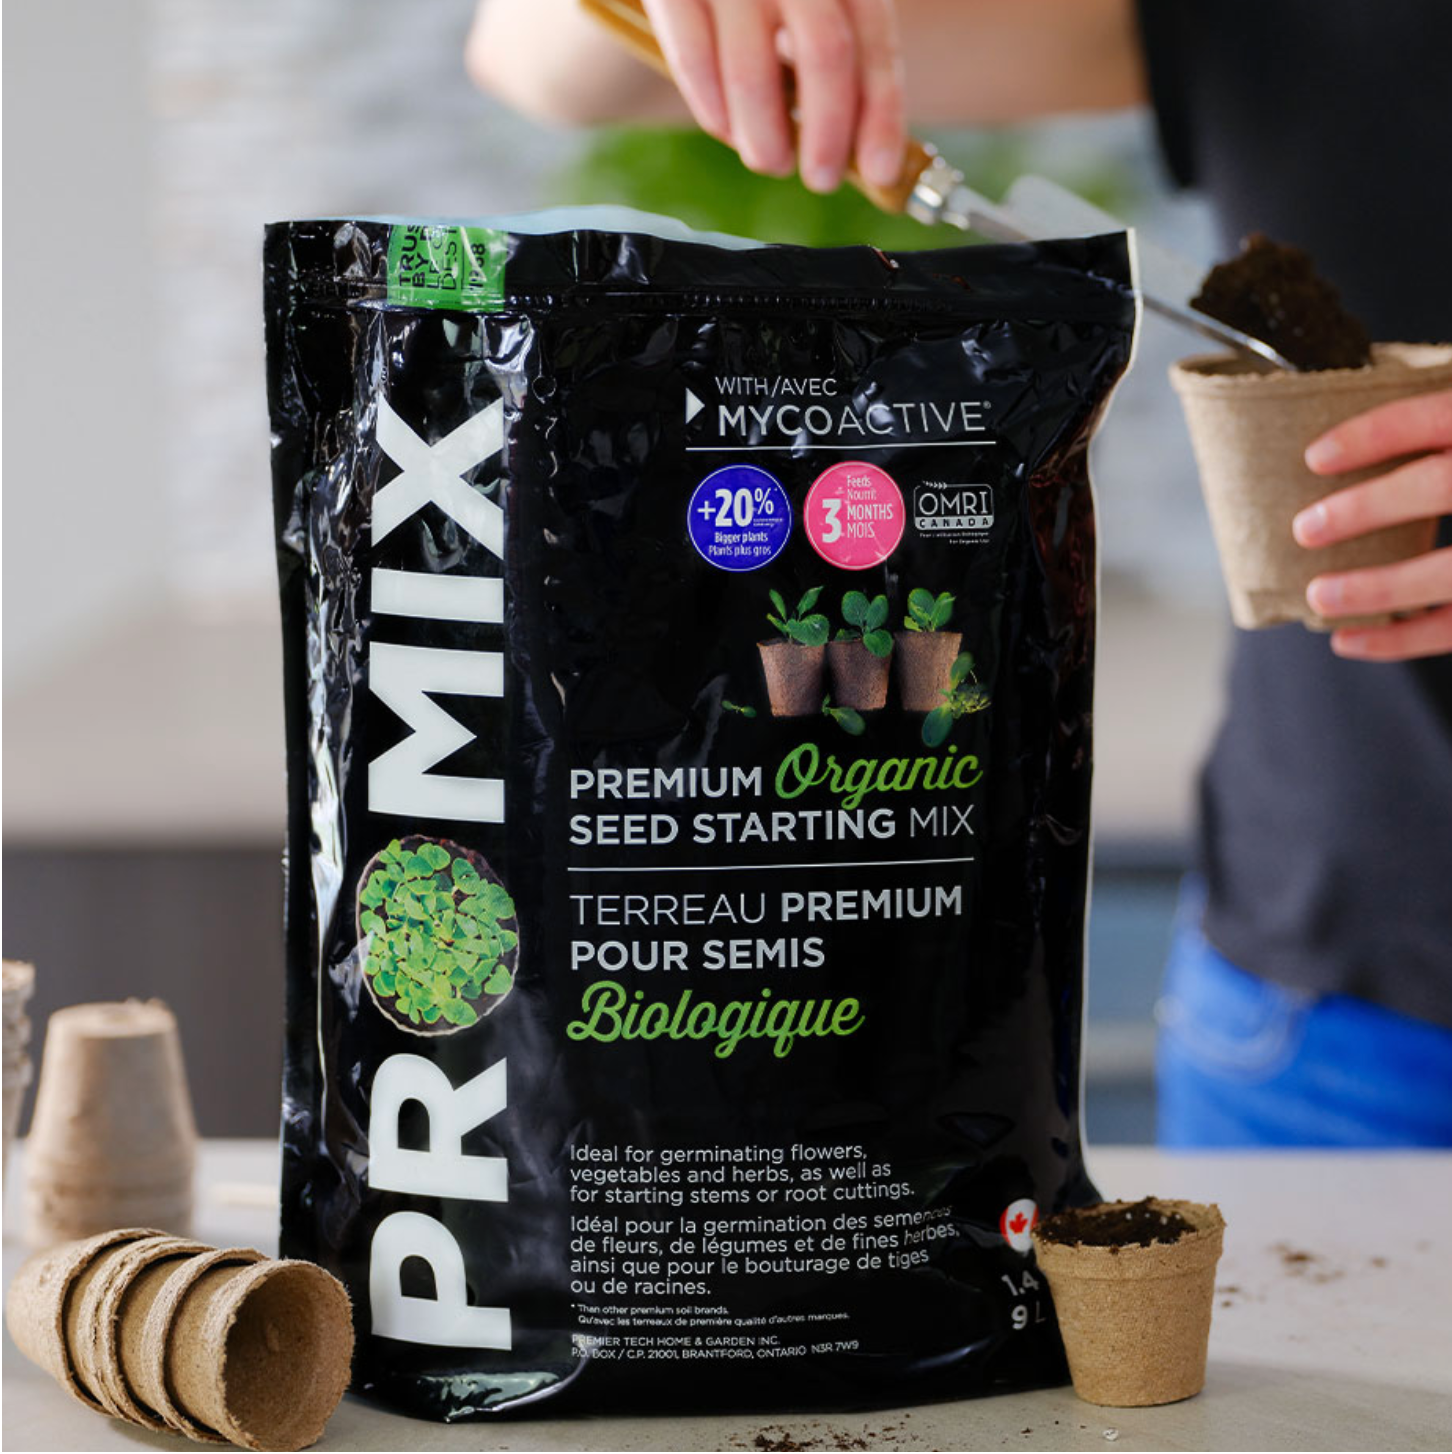
A fantastic way to get a healthy start for your seedlings. This mix can be used for all flower and vegetable seedlings.
- With MYCOACTIVE technology to stimulate vigorous growth for greater stress resistance, stronger roots leading to healthier plants with greater resistance to transplant shock
- Formulated with coco fibre that helps manage moisture levels and protects roots from rot
- Organic fertilizer that gradually feeds plants for up to 3 months
- OMRI Listed for use in organic gardening
Ingredients:
- Canadian sphagnum peat moss
- Coir (coco fibre)
- Perlite
- Limestone
- Organic fertilizer
- Mycorrhizae - PTB297 Technology

Jiffystrips are square Jiffy pots joined together for fast and easy use. Since Jiffystrips are planted 'pot and all' there should be no transplanting set-back when plants are set in the garden. Jiffy Pots are OMRI listed making them perfectly suitable for certified organic growers.
4 strips with 8 - 2.25" small peat pots. Total 32 Pots
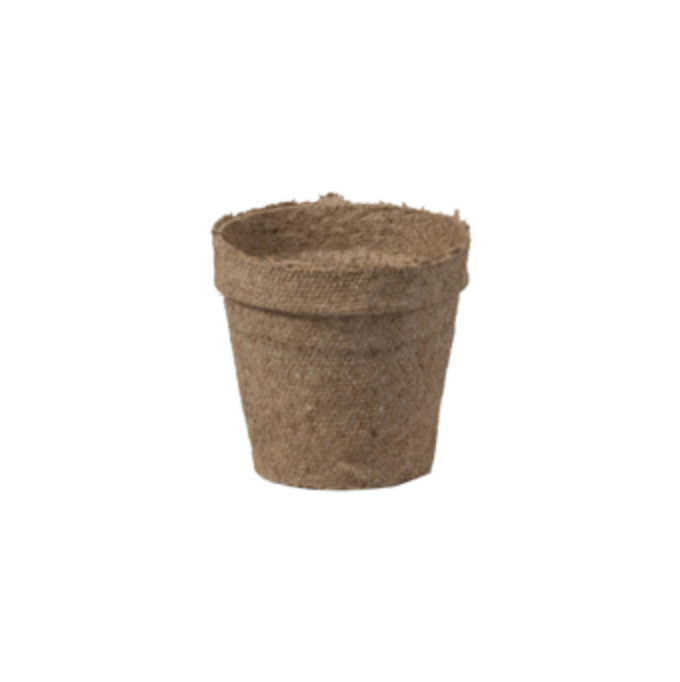
Jiffy Peat Pots are simple to use, saving time on gardening tasks. Plus, since whole pots are planted, there's no need for transplant shock when transferring to the garden. Additionally, these pots are OMRI-listed, making them ideal for organic growers\
2" Round Pots


Scarlet Nantes is the most popular and dependable home garden carrot variety. Roots are sweet and tender yet incredibly crisp. Bright orange in color and nearly coreless, these are ideal for freezing.
Days to Germination: 10 to 14 days
Days to Maturity: 68 days


Excellent quality, reddish-orange tender carrot which is a favorite for processing. Half long and pointed, crisp and sweet. Perfect for slicing and dicing as well as for canning and freezing. HINT: for best flavor, harvest when roots are no more than 5 cm (2") in diameter.
Days to Germination: 10 to 14 days
Days to Maturity: 65 to 80 days
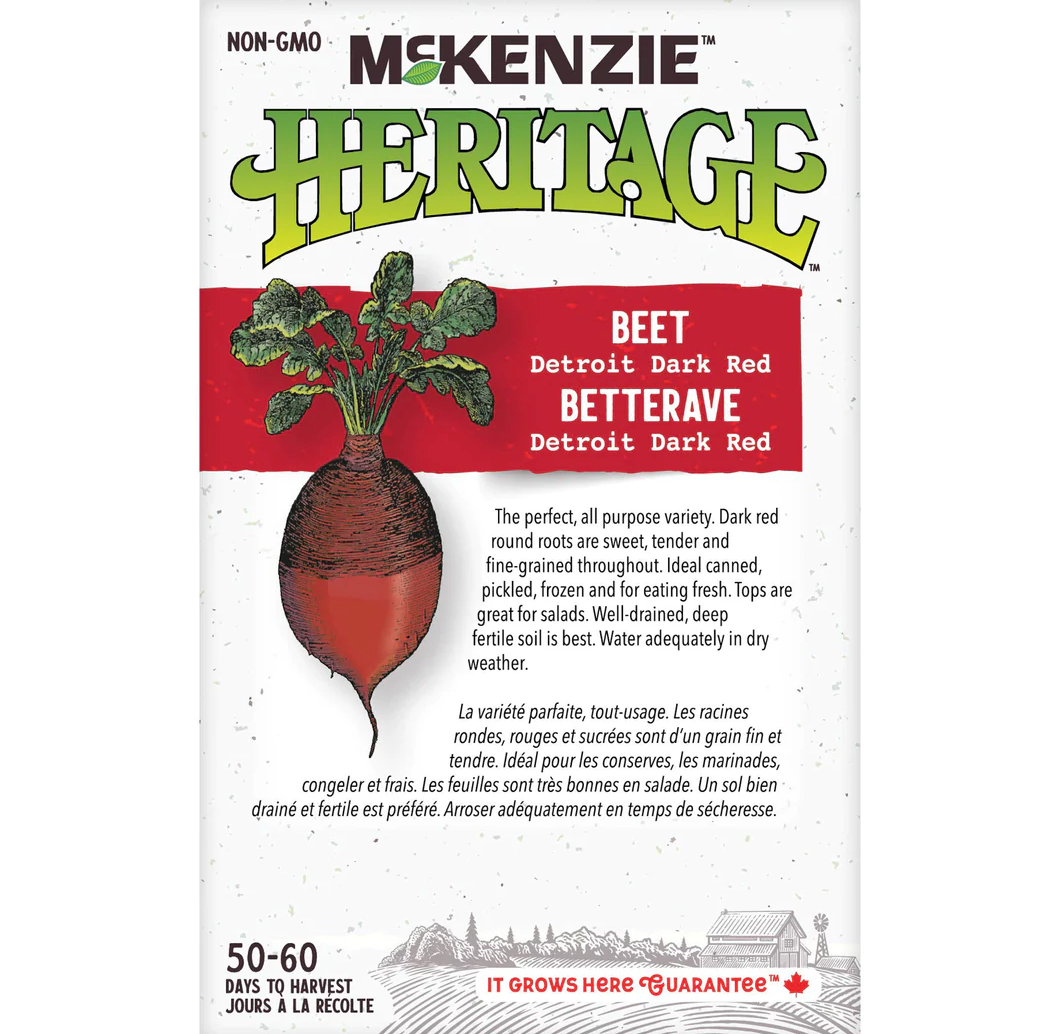
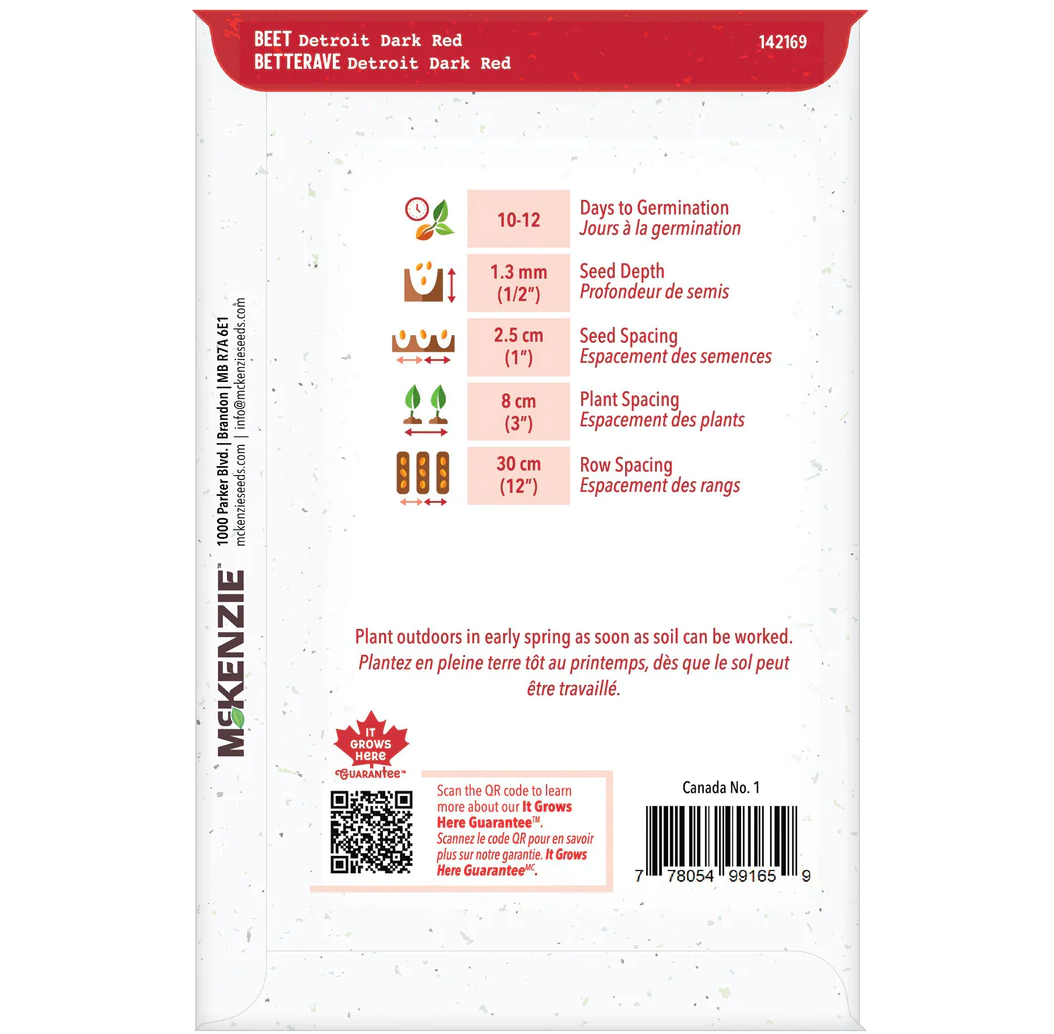
Detroit Dark Red is the perfect all-purpose beet variety. This medium-early variety produces round, dark red roots. These beets are very enjoyable, growing tender and fine-grained throughout. Ideal for use fresh, canned, pickled and frozen. Tops are great for salads too!
Days to Germination: 10 to 12 days
Days to Maturity: 50 to 60 days
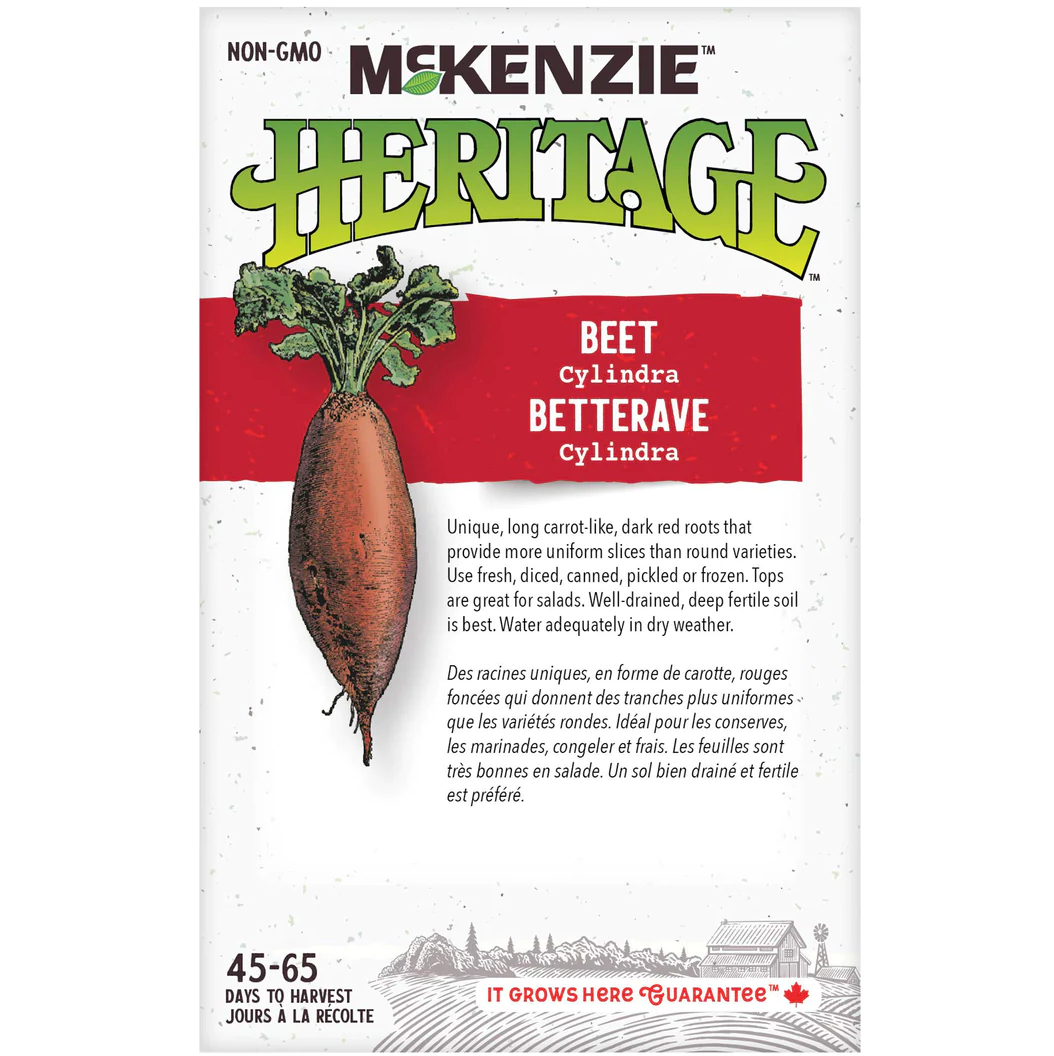
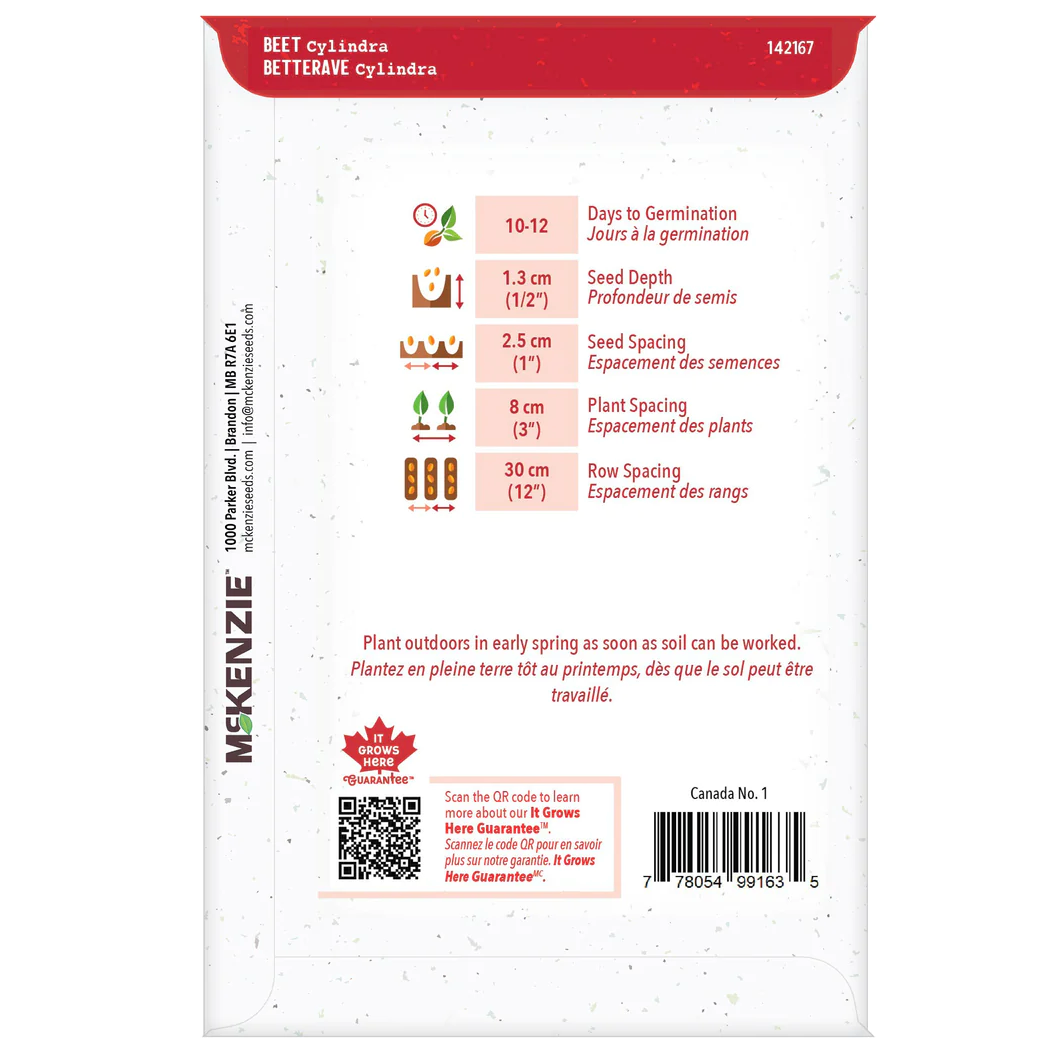
Unique long carrot-like dark red roots provide more uniform slices than round varieties. The tops are excellent greens for salads. Use fresh, diced, canned, pickled or frozen. Tops are great for salads. Beets grow quickly and can be re-sown every 2 weeks until mid-summer.
Days to Germination: 10 to 12 days
Days to Maturity: 45-65 days


The perfect green to grow, even in hot weather. Broad, dark green leaves have a delicate spinach flavor. Stems are broad, thick and white in color. Leaves can be picked at any time or cut leaf stalks just above ground level and the plant will continue to produce all season long. Both stalks and leaves are edible. Delicious in salads, quiche or steamed with butter. Freezes well.
Days to Germination: 7 to 10 days
Days to Maturity: 50 to 60 days
Best Container Size: 12"+


Enjoy the thick, dark green, crinkled spinach leaves either raw or cooked. Heavy yields and slow to bolt and go to seed. This cool weather vegetable is easy to grow in rich, well-drained soil. Requires plenty of moisture.
Days to Germination: 7 to 21 days
Days to Maturity: 40 to 48 days
Best Contianer Size: 12"+


Round, bright red colour, with crisp and white solid flesh, resembles a cherry 2 cm (3/4") in size. HINT: for space conservation, radishes can be planted in the same rows as onions and parsnips.
Days to Germination: 4 to 7 days
Days to Maturity: 20 to 25 days
Best Container Size: 12"+


The best known loose leaf variety. Medium to large upright, light green leaves which are frilled and crisp. Mild and flavorful. Earliest to bear and an exceptionally fast grower. Slow to bolt. It can be grown later in the spring than most other varieties.
Days to Germination: 7 to 10 days
Days to Maturity: 45 days
Best Container Size: 12" +


A high quality variety that produces an abundance of cucumbers! Black spined, 15 cm (6") long dark green cucumbers, makes it great for pickling.
Days to Germination: 8 to 10 days
Days to Maturity: 55 days


A very productive variety of white spined, 18-20 cm (7-8") long green cucumbers that are tender, crisp and delicious. Eat fresh or sliced in salads.
Days to Germination: 8 to 10 days
Days to Maturity: 50 to 70 days


Sugar Snap Peas are an excellent disease resistant variety. The vines provide an abundance of scrumptious, completely edible 8 cm (3") pods. These heavy yields have a delicious sweet flavor and crisp texture that tastes great raw, stir-fried, steamed or in salads. It is also ideal for freezing.
Days to Germination: 5 to 10 days
Days to Maturity: 70 to 75 days
Growing Height: 2m (6')


Lincoln Homesteader Peas have been a favorite of gardeners for generations. Its popularity is thanks to its very productive yields of top-quality, sweet-tasting peas. Heat tolerant and disease resistant, this variety produces slender 8 cm (3") pods with 8-9 small peas per pod. Enjoy exceptional tenderness and sweetness fresh from the garden or frozen.
Days to Germination: 5 to 10 days
Days to Maturity: 63 to 68 days
Growing Height: 30"


A very dependable and productive variety! One of the earliest maturing peas, with a dwarf habit. Produces 10-12.5 cm (4-5") pods with 8-10 large, sweet peas. Good yielder. An all purpose pea that grows under a wide range of conditions. Successive sowings every two weeks until early June, while the soil is still relatively cool, will prolong the harvest season.
Days to Germination: 5 to 10 days
Days to Maturity: 55 to 60 days
Growing Height: 18"


Green Arrow Peas produce very heavy yields and have outstanding flavor. Long 10 cm (4") pods fill with up to 11 peas per pod. The plants are very vigorous bearing pods in pairs on top of the vines, making harvest a snap. These plants are disease resistant and will require some support to keep the productive plants upright.
Days to Germination: 5 to 10 days
Days to Maturity: 58 to 63 days
Growing Height: 24-30"